Happy Thanksgiving, everyone!
I am thankful today for all God's blessings: my loving family including ten grandchildren, a warm home and lots of fabric stash!
Happy Quilting!
Gwen
Thursday, November 22, 2012
Monday, November 19, 2012
Wish list!
I LOVE quilting and sewing notions! I am a notions addict and I have never seen a notion I didn't like. Or presser foot!
Here are a couple shown recently on "Sewing With Nancy" on PBS.
http://www.creativefeet.com/products/feet/satinedge-foot
http://www.nancysnotions.com/product/flower+stitch+foot+low+shank.do?sortby=ourPicks
I want BOTH of these!
Happy quilting (and sewing!)
Gwen
Here are a couple shown recently on "Sewing With Nancy" on PBS.
http://www.creativefeet.com/products/feet/satinedge-foot
http://www.nancysnotions.com/product/flower+stitch+foot+low+shank.do?sortby=ourPicks
I want BOTH of these!
Happy quilting (and sewing!)
Gwen
Tip of the Day!
Quilt piecing instructions often say to start the seam 1/4 inch away from the corner of the fabric. This can be tricky, especially when you want to reinforce the beginning of the seam. I find it is easier to turn the pieces around and sew TOWARD the beginning point, stop with the needle down, turn the fabric 180 degrees and sew on to the end. This technique is especially helpful when making that dreaded "Y" seam.
Happy quilting!
Gwen
Happy quilting!
Gwen
Thursday, November 15, 2012
Confessions of a YouTube Junkie
Yes. I am a junkie. I love YouTube. Especially all the wonderful quilting and sewing tutorials!
Lately, I have been watching a lot of Kaye Wood. If you haven't discovered her, check out her hundreds of videos available. She has been around over 40 years in the quilting world. Or, as she puts it, BRC - Before Rotary Cutters. I remember those days, too. Tracing templates onto fabric and cutting with scissors. We quilters of today have so many reasons to be thankful.
http://kayewood.com
I have my three year old grandson Wyatt visiting with me for a few weeks, so will not be getting much actual quilting accomplished. A perfect time to indulge my YouTube obsession!
Happy Quilting!
Gwen
Tuesday, November 13, 2012
Modifying Free Motion Quilting Foot
I am learning to do free motion quilting on my Brother sewing machine. One of the difficulties for me was finding a presser foot that does not block my view of the needle and previous stitches. I found a great site on YouTube with Leah Day. She is an excellent teacher with wonderful demos. One of her tips was how to modify an inexpensive generic free motion quilting foot for easier quilting.
Check out this tip at:
http://www.youtube.com/watch?v=APD6s7PwoqU
While you are there, be sure to check out Leah's excellent demos. Also, please go to her shop site and get the tools she uses in her demos.
Thanks, Leah!
Happy quilting!
Gwen
Check out this tip at:
http://www.youtube.com/watch?v=APD6s7PwoqU
While you are there, be sure to check out Leah's excellent demos. Also, please go to her shop site and get the tools she uses in her demos.
Thanks, Leah!
Happy quilting!
Gwen
Monday, November 12, 2012
Mini Quilt Shop Hop
I visited two quilt shops while traveling from my home in O'Brien, Florida to my niece's wedding in Cocoa, Florida.
My first stop was at the Sew & Quilt Shop in Bunnell, just off Interstate 95. A Bernina, Janome and Gammill dealer, this super quilt shop has a great selection with tons of fabric, notions and a nice variety of yarn. Classes are offered for all skill levels. Kelly was very helpful and explained that many of the samples usually hanging on the walls were at the quilt show at Stephen Foster Park in White Springs.
Saturday morning I visited Sew Central on Merritt Island, FL. The shop specializes in classes in sewing, quilting and machine embroidery and are authorized dealers for Viking sewing machines. They stock fabric, loads of patterns and have beautiful samples all over the shop. I enjoyed talking with Sue about all this nice little shop has offer.
Here are a few photos:
Sew and Quilt Shop in Bunnell, Florida:
Sew Central in Merritt Island, Florida:
Happy quilting!
Gwen
Thursday, October 18, 2012
On the Road Again!
Getting packed to go to my niece's wedding in Cocoa, FL this weekend. This is also the annual Cocoa Village Arts and Crafts Festival! I am hoping to be able to take in part of this event, in addition to the wedding on Saturday afternoon.
I am planning a short "shop hop" on Saturday morning in Merritt Island and Cocoa. Should be a fun weekend.
When I get home from Cocoa on Sunday, I will repack for an extended stay with my daughter, Dawne, and her family in Council Bluffs, Iowa (in the Omaha, Nebraska area). I am taking my sewing machine, fabrics and all the supplies I can think of, but I am sure I will have to buy something while I'm there. Iowa is THE quilting state, you know.
I am also planning to get in a visit to the Quilt Museum at the University of Nebraska in Lincoln. I have always wanted to go, planned the trip many times, but just never did make it. Maybe this time!
I hope to still be able to post while in Iowa, so be on the lookout for lots of good photos.
Happy quilting!
Gwen
Quilting Tip of the Day
Who says that "quilt in the ditch" and grid design stitches have to be plain? Get inspired by all those neat decorative stitches on your machine. Use one (or more!) of these fancy stitches with your walking foot or even feed foot.
Practice first on a quilt sandwich using the same fabric and thread as the actual quilt. Be sure the width of the stitch is not wider than the needle opening of your presser foot.
Not all stitches will look the same when stitched with an even feed foot. Make samples, adjusting the width and length, until you get the desired stitch.
You can use specialty embroidery thread or metallic thread to spice up your next quilt project. This technique looks especially nice on a crazy quilt using your scraps left over from other projects.

Happy quilting!
Gwen
http://etsy.com/shop/gwensquiltbarn
Practice first on a quilt sandwich using the same fabric and thread as the actual quilt. Be sure the width of the stitch is not wider than the needle opening of your presser foot.
Not all stitches will look the same when stitched with an even feed foot. Make samples, adjusting the width and length, until you get the desired stitch.
You can use specialty embroidery thread or metallic thread to spice up your next quilt project. This technique looks especially nice on a crazy quilt using your scraps left over from other projects.
Happy quilting!
Gwen
http://etsy.com/shop/gwensquiltbarn
Wednesday, October 17, 2012
Why I Make Quilts
This is why I make quilts!


This is Meadow, a friend's granddaughter. She loves her child's version of Modern Cathedral Window Quilt. In the windows are mermaids (or Bubble Guppies), ducks, kitty cats, and Sponge Bob!
Why do you quilt?
Happy quilting!
Gwen
Embroidered Crazy Quilt
Have a sewing/embroidery machine? I have a small format Husquvarna with the 4x4 inch hoop. Not very large, compared to the newer machines on the market today. Great for embellishing ready to wear and craft projects. I collect nursery rhyme designs and have worked a dozen or so onto white muslin squares. And, there they sat, on the shelf in my quilting barn, waiting for inspiration. That inspiration came with the birth of yet another little grandson.
I loved the idea of incorporating the nursery rhyme designs into a baby quilt for the new arrival, but was concerned that it would look too "girly." Looking through my fabric stash, I came across several fat quarters and 5" squares of reproduction 1930's juvenile prints.
I wanted to get the quilt finished before the baby started kindergarten and decided to use the "flip and sew/quilt as you go" method block construction in a crazy quilt design around the embroidered squares. I made scrappy binding using leftover bits of the reproduction fabrics. I machine stitched the binding.
The result was a bright and cheerful quilt that will be enjoyed for many years.

I hope this quilt inspires you to make your own Embroidered Crazy Quilt.
Happy quilting!
Gwen
I loved the idea of incorporating the nursery rhyme designs into a baby quilt for the new arrival, but was concerned that it would look too "girly." Looking through my fabric stash, I came across several fat quarters and 5" squares of reproduction 1930's juvenile prints.
I wanted to get the quilt finished before the baby started kindergarten and decided to use the "flip and sew/quilt as you go" method block construction in a crazy quilt design around the embroidered squares. I made scrappy binding using leftover bits of the reproduction fabrics. I machine stitched the binding.
The result was a bright and cheerful quilt that will be enjoyed for many years.

Happy quilting!
Gwen
Tuesday, October 16, 2012
Quilting Tip of the Day
I purchased some "glow tape" for marking the cutting line on my ruler. I had been using this on top of the ruler and still had trouble getting the correct placement on the fabric when cutting. Tip: Put the glow tape on the bottom of the ruler next to the fabric. Putting two or three layers of tape creates a "bump" that fits snugly up against the cut edge of the fabric. Viola! Correct ruler positioning!

These "stacks" of tape can be peeled off, repositioned and used again and again.
Happy quilting!
Gwen

These "stacks" of tape can be peeled off, repositioned and used again and again.
Happy quilting!
Gwen
Monday, October 15, 2012
Quilting Tip of the Day
Taking a photo of block arrangement helps find mistakes in block placement. Also, step away from the blocks and come back later. It is amazing how many times I have realized that one or two blocks were turned the wrong way. This is especially helpful with log cabin patterns.
The hidden wells blocks below have errors. Can you see them? The top corner triangles should be the mirror images of each other, as should the bottom corners. Hint: The bottom corner triangles on the left block are wrong; the top corner triangles on the right block are wrong.

Happy quilting!
Gwen
The hidden wells blocks below have errors. Can you see them? The top corner triangles should be the mirror images of each other, as should the bottom corners. Hint: The bottom corner triangles on the left block are wrong; the top corner triangles on the right block are wrong.
Happy quilting!
Gwen
Sunday, October 14, 2012
Tip of the Day
Use the same ruler when cutting all fabrics for a project. Each ruler can be a shade different in size and can make a big difference in accuracy when sewing pieces and blocks together.
Saturday, October 13, 2012
Vintage Grandmother's Flower Garden Blocks
 I have been working on the Vintage Grandmother's Flower Garden blocks. My friend, Jane King Folds, gave them to me several years ago. Jane's mother made the colorful blocks many decades ago. Looking at the fabrics, I would say mid-1970's. Not all the fabrics are cotton. Some of the blocks are hand stitched, some machine stitched. Sometimes both in the same block. I never had the opportunity to meet Mrs. King, but I think we would have been great quilting buddies. "Use what you have!"
I decided to put the blocks on unbleached muslin squares using the raw edge machine applique method. I have a nice "bite to the left" applique stitch on my Brother PC420 machine. I shortened the stitch length and made it a little wider. I used black thread on top and beige in the bobbin.


I starched the vintage blocks liberally until they were quite stiff and pinned every outside hexagon to the background muslin square. I was a little apprehensive about the hand stitches coming apart, so I appliqued around every round of hexagons. I will machine quilt in an all-over pattern.


Happy quilting!
Gwen
http://etsy.com/shop/gwensquiltbarn
Thursday, October 11, 2012
It's Who? Doctor Who!!!
For anyone who thinks all I do is make quilts. Here is a little project I have been working on this week, along with the Modern Cathedral Window blocks:


The jacket and bow tie before pressing.
And after pressing and top stitching. It is a nice warm brown in true light, as show in the top photo.
T
Modern Cathedral Window Progress Update
The blocks are all done! All 300+ of the little boogers!
Now to arrange them in a pleasingly random order and get the top sewn together.

Now to arrange them in a pleasingly random order and get the top sewn together.
Happy quilting!
Gwen
Visit my Etsy shop at:
Wednesday, October 10, 2012
Here is a link to my Etsy shop. Take a look at some of my quilts. I would greatly appreciate you passing the shop link along to your friends. Thanks!
Quilting From the Heart Etsy Shop
Happy Quilting!
Gwen
Tuesday, October 9, 2012
Modern Cathedral Window Block Tutorial
Photos and tips for making the "Modern" Cathedral Window block. I hope this helps!
Each block consists of one 6 1/2" background fabric square, four 3 1/2" background fabric squares and one 3 1/2" colored fabric for the "stained glass."


Open the folded large square and bring raw edges together, matching seams. Finger press the seams in opposing directions so they will "snug up."


Press the seam open to decrease bulk in the block. Turn over and press the top folded diamond.
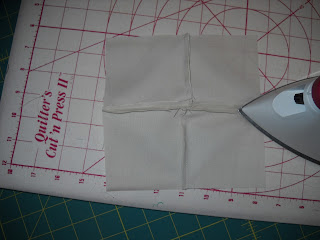


Each block consists of one 6 1/2" background fabric square, four 3 1/2" background fabric squares and one 3 1/2" colored fabric for the "stained glass."

I cut mine using my June Tailor Short Cut strip cutting mat, then subcut into squares.

Fold the large square in half with the fold at the bottom. Sandwich two small squares on each end of the folded square, matching raw edges and stitch down each end through all thicknesses. The folded square will be a little shorter than the 3 1/2 inch squares. This is your seam allowance. I used a shorter stitch length and a scant 1/4" seam allowance.


Open the folded large square and bring raw edges together, matching seams. Finger press the seams in opposing directions so they will "snug up."

I use several pins to hold the raw edges together until stitched.


Center the colored fabric square in the diamond. Fold the center sides of the folded diamond over the raw edges of the colored fabric and pin each side. I pin all four sides then lap the left point over the right and pin the first corner to be sewn. I start topstiching in this corner and sew clockwise around the center square, pinning the other three corners as I reach them. Note the directional placement of my pins, with the heads toward me. It is easier to remove the pins as I reach them in this direction. Use a longer stitch for topstitching.


Viola! The completed Modern Cathedral Window block!
Friday, October 5, 2012

Tuesday, October 2, 2012
Regroup and back to Modern Cathedral Window quilt
I prepared the binding for the Hidden Wells quilt and have that put away until I can get back into my barn to get the quilt sandwich put together.
Soooo, back to the Modern Cathedral Window quilt. The background fabric has arrived and I think I have enough squares cut out to make the 120 or so blocks I still need to complete.
I am also working on designing updated cutting and piecing methods to make old fashioned quilt blocks. I want them to finish at 12 inches and use charm squares, jelly rolls and fat quarters. When I get a few more worked out, I will post them as a "Block of the Month" quilt.
And, in my "spare" time, I am practicing free motion quilting on my home machine. I mostly do echo quilting or quilt-in-the-ditch with my walking foot, so this will be a real adventure!
I joined the Ft. White Quilt Guild on Yahoo Groups yesterday and am looking forward to meeting some new quilting friends. I am pretty busy for the next couple of months, but 2013 is a whole new year!
Happy quilting!
Gwen
Here is a photo of a few of the Modern Cathedral Window blocks.

Monday, October 1, 2012
Hidden Wells Quilt
The top is finished! I had to scappy piece the border since I made the quilt from my stash and quantity of each fabric was limited. Here it is:


I am well pleased with the result. I learned a lot and gained some insight on how I will do my next Hidden Wells quilt.
Experience: What you need right before you get it.
Happy Quilting!
Gwen
Saturday, September 29, 2012
Just Strippin' along! Hidden Wells Quilt Grows
I cut four more strips from each fabric for more strips sets. I ran out of the yellow center fabric and have substituted another fabric. I don't think this will be too noticeable, as it is a "scrappy" quilt anyway. I have plenty of the added fabric, so I can always add a border to tie it all together. I plan to scatter these blocks around the quilt to make them less noticeable.
Experience: What you need right before you get it.......
Happy quilting!
Gwen
Experience: What you need right before you get it.......
Happy quilting!
Gwen
Friday, September 28, 2012
Hidden Wells Block Construction & Photos
Here is a photo of my strip set (a scrap end). I keep this by my machine when sewing additional strip sets. Here are a few tips:
*When choosing fabrics, putting a dark or "standout" fabric on the outside of the strip set makes for a very striking finished block. I chose two different dark fabrics for mine.
*If you have a problem with bowing of the strips cut selvage to selvage, cut each strip in half before constructing the strip set.
*Sew strips together from the center strip out, alternating sides so that you sew up one side and down the other. Helps with bowing and stretching of the strips.
*Cut the center strip larger than the others. I cut mine 1/2 inch large (2" instead of 1 1/2"). The center strip becomes the very center of each completed block. If cut too small, this "center' becomes just a little dot. Next time I will cut strips 1 1/2" and the center strip 2 1/2".


Happy quilting!!
*When choosing fabrics, putting a dark or "standout" fabric on the outside of the strip set makes for a very striking finished block. I chose two different dark fabrics for mine.
*If you have a problem with bowing of the strips cut selvage to selvage, cut each strip in half before constructing the strip set.
*Sew strips together from the center strip out, alternating sides so that you sew up one side and down the other. Helps with bowing and stretching of the strips.
*Cut the center strip larger than the others. I cut mine 1/2 inch large (2" instead of 1 1/2"). The center strip becomes the very center of each completed block. If cut too small, this "center' becomes just a little dot. Next time I will cut strips 1 1/2" and the center strip 2 1/2".

************************************************************
After I cut squares from the strip set, I labeled one square. I used this throughout the construction process to help identify any pieces. It is very easy to confuse the B and D pieces. 
************************************************************
When constructing the blocks, keep in mind that you are basically alternating the A piece with the B and D pieces and the C piece with the B and D pieces. Some online instructions number the resulting triangle squares. I found it less confusing to refer to them as A and C blocks with the B and C pieces alternating. You choose your method. Also, pay close attention to seam pressing. Good instructions are given in the link in an earlier post, so I will not repeat it here.
Look closely at the photo above. The first couple of blocks I assembled, I didn't note the placement. Needless to say, the blocks didn't work out correctly. The top row has the D piece on the left and the bottom row has the B piece on the left. This is very important! The blocks will go together other ways, but this is the only way that works. Note the diagonal strips match up on either side and the "tiny triangles" formed at the middle outside corners at the same fabric. This is the best way I found to "check" my placement.
Below is a completed "A" block and a completed "C" block.


************************************************************
Here is a potential layout for the blocks. I just alternated A and C in a checkerboard pattern. I love the "hidden" blocks that appear. Also note the yellow strips form an X pattern, too. Love, love, love this quilt block. More to come later!

Wednesday, September 26, 2012
Hidden Wells Quilt Block
Here are the measurements on my block:
For each strip set cut all strips the width (selvage to selvage) of the fabric. I used a 7-strip set. I cut 6 strips at 1 1/2 " wide and 1 strip 2" wide. The wide strip is the center strip. This needs to be a little wider, as it works out to be the center in each finished block. When I make another quilt, I plan to cut the center strip twice as wide as the outside strips. My block centers are really tiny.
After sewing the strips together, measure the width of the strip set. Mine measured just a hair over 7 1/4". Cut squares the width of the block. I got 5 strip set squares from each strip set.
I assembled the first two blocks before I completely understood the directions given in a link I am sharing below. I don't believe my mistake will stand out when the quilt is finished. Like a wise woman once said, "Mistakes are there for the benefit of those looking for them."
http://www.reddawn.net/quilt/hwells.htm
Take a look at the photo from yesterday's post and see if you can find my mistake.
Keep on quilting!
Gwen
Tuesday, September 25, 2012
Hidden Wells Quilt Block
This may be my new "favorite" quilt block! Lots of fun to create and so many possibilities.


Friday, September 21, 2012
Jacksonville Florida Quilt Fest
I only had a short time to look at the quilts and vendors booths, but enjoyed it very much. Here are a few of the beautiful quilts that were on exhibit. Some were ribbon winners, some I just liked. These include the bargello quilts. I am planning a bargello project in my near future.


Subscribe to:
Posts (Atom)